Tuesday, May 24, 2011

Tool Kit

Sometimes I worry about us woodworkers.  We tend to go off to our shops and isolate ourselves from the world.  (Did you hear about the guy who always stayed at home because he didn’t want to have to kiss his wife goodbye?)  As a follow-up to our safety week and as a public service, I call attention to a bulletin issued last week by the Center for Disease Control and Prevention in Atlanta.  Use this information to stay safe and keep buying tools.

The Festool Contractor's first aid kit may not have zombie antidote, but it's got everything else you might need!
The CDC issued guidelines to follow in case of a Zombie Apocalypse.  (You may think I am making this up, so here is the actual real link). This warning really hit home with me since my shop is in the back yard in the deep woods so to speak, and it can get really spooky (not to mix metaphors) out there at night.  After dark with the lights on in the shop, you cannot see what is going on outside, and when you get absorbed in a delicate little dovetail joint, the whole world could end around you and you would hardly know it until it was too late to do anything about it (as if you could).  I have often wondered what steps I would need to take in case zombies (the technical term for the condition is Ataxic Neurodegenerative Satiety Deficiency Syndrome) showed up at the shop.  For instance, the CDC recommends that you set up a meeting place outside the home so your family can rendezvous and escape together to a zombie-free refugee camp.  They post a list of supplies to take with you including water and food and a first aid kit, though they do admit that once bitten the first aid kit will not be of much use.

We agree with the CDC.
The thing they are missing though, is defensive tools to protect yourself from a zombie attack.  I think woodworkers are particularly well-equipped to protect themselves with things both portable and effective already in nearly every woodworking shop.  My lathe skew chisel (properly sharpened) with its slanted blade and sharp point would be very effective in zombie defense.  My battery powered drill (I will need to keep the batteries charged better than I normally do) with a two inch spade bit would be helpful.  Oh wait, how about the drill mounted three inch hole saw -- I think that would be better.  The battery powered reciprocating saw is an awesome tool, effective in many situations where no other tool will work. If you have ever caught your finger in one of those Japanese cut-off saws, you will recognize what damage that thing could do when properly applied to larger fleshy appendages.  And as in most woodworking operations, having this saw cutting on the pull stroke makes it much easier to use when you are in a rush to finish a project.  Last but not least, is my chain saw.  I prefer a 20 inch blade to give me a little more depth of cut, and you don’t need a really big saw -- too heavy to lift to shoulder height on a continuing basis.  Just make sure it has the proper gas and oil mix so you can get it started easily.  When you need it, you need it quick.

Get your zombie apocalpyse 'Go Bag' ready!
I am going to recommend to the store that we put together a Highland Zombie Apocalypse Preparedness Kit.  It should include all the materials recommended by the CDC, plus the things I have suggested.  I think we will put  it in a big tool bag so you can grab it and go on short notice.  The problem with that is you will not be able to use the tools from the Kit without taking a chance on missing some of them when you have to leave in a rush.  Just use them and  put them back in the Kit when you are done.  We are open to suggestions here people.  Send us your ideas and perhaps you will see them incorporated into our Kit.  Now go fuel up the chain saw.  Be prepared!!  Stay safe.  Keep your brain.

Monday, April 11, 2011

Skew Class: Conquering my Fears

I hesitate to say I have tamed the skew, but at least I can live in the same house with it now.
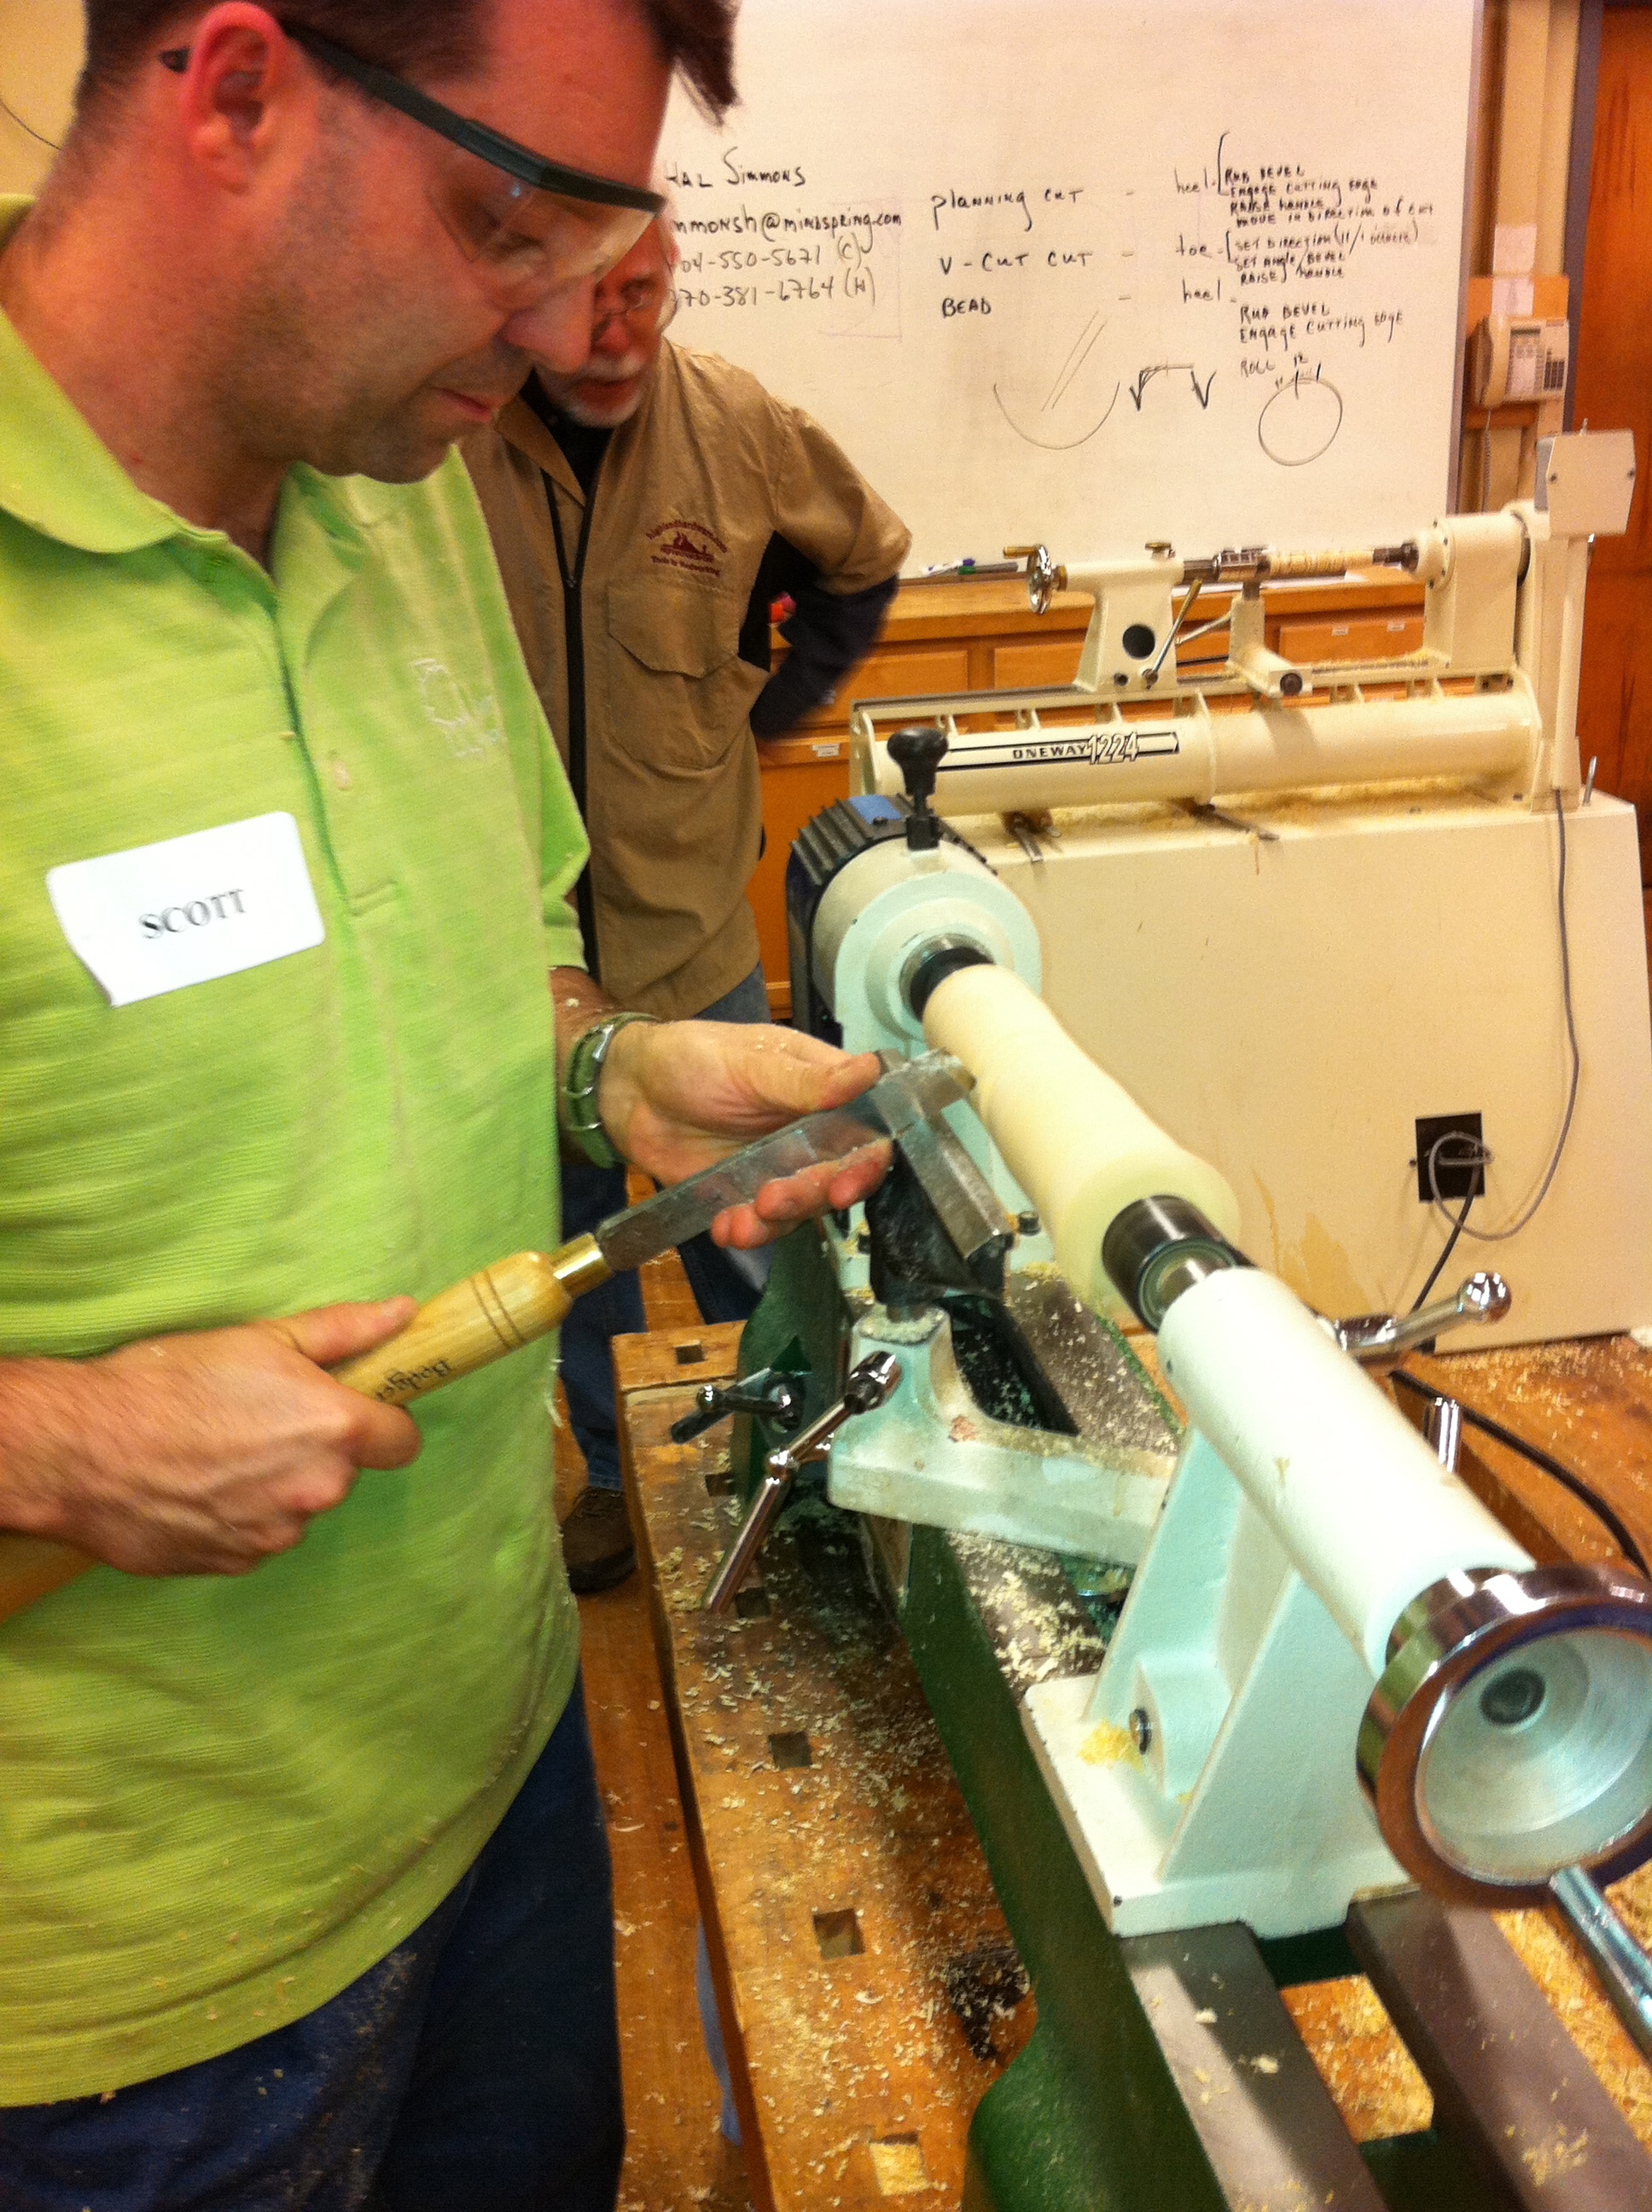
I went to the “Taming of the Skew” class at Highland last week and we spent three good hours with Hal Simmons, a professional turner, to try to solve some of the problems many people have trying to use a skew chisel.
We started out by learning how to sharpen the thing, first on a grinding wheel and then to a flat stone.  As with almost any woodworking operation, having a sharp tool is a good thing.  Hal asked each of us in turn what experience we had and what our issues were with the skew. After some discussion we moved to the fun part and we all got a good laugh.   When Hal had a square piece of wood set up in the demonstration lathe, he turned the lathe up to very high speed and prepared to stick the skew into the wood.  The whole class scattered like a flock of buzzards when a car comes along and Hal was standing there by himself.  Apparently we all shared the same fear of the skew.

Trying to Tame It

Once he calmed us all down and got us back to the demo lathe, he demonstrated how to use the skew to round off a work piece.  He was standing there rounding that wood and not even looking at it,  and we were all standing around with our mouths open and pleading with him to watch the work, because we were absolutely positive we knew what was going to happen and it was not going to be pretty.


On The Way to Carnegie Hall
After we learned the basic planing cut, we moved into cutting a groove and then to widening that groove into all those beautiful shapes found on candle holders and chair legs and balusters.  The cuts are simple in theory when explained well, but as with most skills, take a while to develop the proper motions.  It's the same answer you get in New York City when you ask someone how to get to Carnegie Hall.  Practice, Practice, Practice!
At least I am not afraid of the tool anymore, and with a lot of practice I should be able to make some nice stuff.  What a great class and it is offered every few months at the High.  It runs from 5:30 to 8:30 in the evening and only costs $75. Go ahead, tame that skew!!

By the way if you are a Kindle owner, click over to Amazon and check "Blogs" for Kindle and look me up.  You can subscribe and have this automatically downloaded into your Kindle.  See You There!!

Wednesday, March 30, 2011

Router Table, Router and Custom Moldings

Router Table Setup

Don’t “Duh” me please.  And why would you say “Duh”?  Because it took me this long to figure I can make my own moldings.  Until the last couple of years I only made things where I could use stock moldings from the big box store.  That beginning point limited me severely and I could only do things which were going to be painted or where finger joints are acceptable (a small portion of fine woodworking to be sure).  I finally figured out from watching Mr. Norm and then getting a good router table in my shop that I can make many very nice moldings out of any wood I choose.  And I don’t have to paint it or try to explain to all my friends that finger jointing is a tree saving environmentally correct methodology and the reason I am charging more for my work.

Over the past couple of months I have been making some small furniture pieces for my church and I wanted them to match the existing pulpit furniture.  Both of the latest pieces are from oak, one red oak and the other quarter sawn white oak.  Needless to say, there are not many custom moldings from those two species and I really wanted them to match.


Can’t buy this!
A few months ago, I purchased the Kreg router table with a new Triton Router from Highland.  What a beautiful setup that is.  I already had a set of half inch router bits and I figured I might as well try the molding process.  It worked!!  I came up with some beautiful stuff and it made the finished project look good.  What works for me is to plane a board to a good thickness and then rout one edge (or both edges) by running it at the router fence.  I then cut the molding off the edge of the board at the table saw and it is done.  I can make as much as I want and it is always the right size and species for the project. Miter it up, nail it up and stand it up.


Waiting for Stain and Finish

One of the great joys of woodworking is doing the final fit of those last little delicate moldings on a project.  There is a timelessness about it which feeds my soul, particularly when I think about spending an extra half hour doing something really well, so people a hundred years from now will touch it and run a finger along it and recognize that someone cared enough to do it really well. Isn’t that why you do woodworking?


PrintFriendly

Monday, March 21, 2011

Redacted Furniture

Do you know what it means when something is “redacted”?  I think of  documents the federal government reluctantly gives up under the Freedom of Information Act where they don’t want you to know what or who they are talking about, so they black out every other word of it and send it to you so they have met the letter of the law but you really don’t know what they are talking about once you see it.
Last year I found a new sales avenue for my Etsy site.  I wanted you to know about it, but I don’t want you intruding on my sales so I decided to write about it and then redact it.  Here it is.

Candle Stand
It turns out there is a pretty good market for we semi-pro woodworkers in the _______ furniture market.  This all got started last year when my son graduated from a Master’s program and at his first job decided he needed a candle stand to enhance the services.  He and I designed one and I mocked up a couple of them to get the scale right and then made one to match the _______ furniture where he works.
I popped it up on my Etsy site and lo and behold, I sold five more of them all over the country.  Actually got tired of making them before it was over.  Then last summer, one of the _______ who bought a candle stand wanted me to make an Advent candle stand to match their _______ furniture.  That turned out pretty well and they were happy with it.  I left it up on the Etsy site and maybe next year I will get some additional sales out of that one too.  It is such a thrill to know that _______ all over the country are using my stuff.  I’m making two more this season, one for my own _______ and another for a friend up the road who is Pastor of a _______.

Advent Stand on the Left (Sudbury UMC, MA)
In making the new stands, I found a new router bit.  When I make a column of four pieces joined at right angles, a lock joint router bit is the thing to use.  These bits cut a joint with a tongue and a slot which fit together when turned at ninety degrees to each other.  The joint locks together and is so firm that clamping is almost not necessary.   The bit is a little bit touchy to set up correctly and it does require a router table.  But man, this thing works like a charm.  You can buy it at Highland.

Lock Miter Bit
The point of all this is you never know where sales  will come from.  There is a market out there for your stuff – you just have to find it and work it.  Buy more tools, make more stuff, sell it, and buy more tools.

Thursday, February 3, 2011

Taming the skew

Ok, let’s get all the puns out of the way.  Try not to skew this up.  The taming of the skew.  Situation normal, all skewed up.  Is that all of them?  Can you think of any more?

Can You Do This? Scares Me to Look at the Picture!!
What all this is coming to is, I am finally taking a turning class on using the skew.  Can we be honest here for just a moment?  I am scared of the thing.  I won’t use it in my shop.  When I pick  up my skew, it catches  before I even walk over to the lathe.  You can imagine what happens when I actually touch the wood with it.  Then when I finally turn on the lathe, well, things just start to happen without warning.  I watch other people use it and it is magical.  They make all those coves, rounds, and steps and it is beautiful and so beyond me.  When I took Peter Galbert’s chair class last fall at the High, he was the best I had ever seen with the skew.  We had the option of bringing our own premade chair legs or using ones Peter made for us.  I would have been out of luck if I tried to make my own before the class.  Just for funsies, Peter made a chair leg during the class and I couldn’t believe how quickly and easily he turned it out.  Wow!!   After he completed it with just the skew, it was so smooth that he had to rough it up (not smooth it out, mind you) with sandpaper so it would take a finish.   I may get there in about ten years of practice.
On February 9th Hal Simmons will teach a class at Highland on Taming the Skew.  It is three hours from 5:30 to 8:30 pm.  When I was in the business world, our staff sat down together and took a careful inventory of all the skills we needed to satisfy our clients.  Any skills we did not have, we acquired by either hiring or training.  I look at my woodworking skills the same way, except I don’t plan to hire anybody.   That is why I keep a close eye on the classes offered at the Highland web site.  This class will complete most of my turning skills and after that, it is a matter of practice.  Sometimes you just need a little bit of help to keep from really skewing something up.  Come on down and meet me there.

Monday, February 22, 2010

I Meet thomas Lie-Neilson

Who is the most well known person you ever met?  I met an ex-Senator once at work, and I was with a Congressman the other day when he brought a large check to our community.  Millard Fuller, the founder of Habitat for Humanity came to town a few years ago and he autographed the hammer I use to help build Habitat houses.  I should have framed it (no pun intended) because Mr. Fuller died awhile back, but it is too expensive not to use.   I do think he would want me to continue to use it to build houses. 

When I narrow the field to woodworking, I met Norm Abram once, and I've taken a class at Highland from Roy Underhill and another one from Mike Mahoney.  I read several books by James Krenov and bought one of the planes he made, and once I sat in that Sam Maloof chair at Highland.

Thomas Lie-Nielsen
Then a couple of weeks ago, I dropped by the store and got to meet Thomas Lie-Nielsen, founder and owner of Lie-Nielsen Toolworks and maker of some of the finest woodworking hand planes and tools made in the world (and they're made right here in America, up in Maine).  He was in town to teach a class at Highland, and also gave some hand tool demos at the store's big winter sale day the day before.  I stand in awe.  Everybody in woodworking knows about these planes and they are beautiful. 


Lie-Nielsen No. 102 low angle block plane
I picked one up and the weight and feel is such that you just know they are the best.  The finish is outstanding and the blades are honed to perfection.  After I picked out the one I wanted, a No. 102 low angle block plane, Thomas autographed it for me with one of those electric engraving pens right on the spot.  I suppose I will have to decide whether to frame this one or actually use it like I do with my Fuller hammer. 

Given enough time and energy, I can pretty much make anything I want out of wood.  But when I look at one of these planes, I cannot even imagine how to begin.  The scope of the metal work, the foundry work, the machining, the fitting, not to mention the actual design to make it beautiful, is just beyond me.  Then on top of all that, it has to cut wood perfectly.  Oh, and by the way, the Lie-Nielsen factory makes a hundred planes a day, which to me is amazing!

I really enjoyed talking to Thomas and I admire his work, but I feel like he did leave all of us short on one thing.  Go look at Chris Schwartz, the editor over at Popular Woodworking magazine and see the clip of him throwing double bit axes at a target.  Thomas taught him how to throw this week when Chris went to visit the Lie-Nielsen factory.  (By the way, we've got plenty of those kinds of axes at Highland. You'll need one of the double bit ones.)

It just occurred to me to wonder: Will Thomas ever be back down here to show the rest of us how to throw an axe?

Thursday, January 21, 2010

Tool Ignorance vs Tool Stupidity

All woodworkers know if necessity is the mother of invention, then laziness is the grandfather and stupid is the father.  (I think I'll try to get that added to Bartlett's Quotations.)  All jigs, templates, shortcuts, power tools, dumb moves and safety practices are heirs of this illustrious family.  

I must admit that grandfather laziness is high in my gene list, but father stupid works quicker for me than the other two.  Fifteen years ago, in the very first two minutes I had my brand new table saw in the shop, I stuck a scrap of 1/4 inch plywood in the blade free hand.  It kicked back into my midsection and the palm of my hand and I learned a good lesson very early.  I instantly gained an immense respect for the tool with thankfully little damage.  Good lesson not soon forgotten. 

band saw.jpg
Long as we are on stupid (ignorance can be cured, stupid is forever), I was working on the switch on my new Steel City band saw a few weeks ago, and like a good boy, I unplugged it first.  When I finished I pushed the "on" button to check my work, and to my surprise and horror, the saw started.  Totally not logical and I instantly looked to see the plug still on the table where I put it before starting to work.  Now I only had one course in electricity in college a long time ago, but transmitting electricity through the air is not common even if it is possible.  Soon as I got back from the bathroom, I turned the saw off and checked the cord.  There are two cords on the saw, one to the task light attached to the back of the saw and the other for the saw itself.  They are identical and both were next to each other in a filled four socket outlet.  I had unplugged the light but not the saw.  Another lesson not soon forgotten.  (I taped the cords together so it wouldn't happen again.)

Then yesterday when I put a new piece of old wood on the lathe, I failed to note sufficiently the crack across the top of the wood.  Ever stand out in the yard and watch a vee formation of geese fly over (never do that with your mouth open) heading away for winter vacation?  I remember standing there and watching that chunk of wood fly across the top of the shop like a flock of geese. Seemed like it took a week.  I have learned instinctively to stand out of the line of fire and I always wear a full face shield and thank goodness for that.

spax screws
When it finally landed, I picked that missile up off the floor and screwed it to the wall (love them Spax screws) behind the lathe to remind me of what can happen.  At least there was no blood or brains on it.  Maybe that started curing stupid.
More Free Woodworking Tips